Hosting a static website using AWS S3, Cloudflare, and GitHub Actions
Pre-requisites
- You have a working dev environment with up-to-date versions of Node.js, npm, and Git
- You have (or can create) accounts with the following services
- You have a domain name purchased and ready to use
Creating the website
Astro is a (relatively) new web framework that allows us to easily create really performant static websites while sending the minimum necessary amount of JavaScript to our clients.
First things first - let’s scaffold out our new project. Open up your terminal, and cd into the directory that you’d like to to contain your project.
For me, that’s ~/src/personal/projects.
Once there, we can go ahead and ask Houston (the Astro team’s cutesy little mascot) to create our new website.
npm create astro@latestAfter confirming that we want to install the necessary package we’re then asked to answer a few questions about our project.
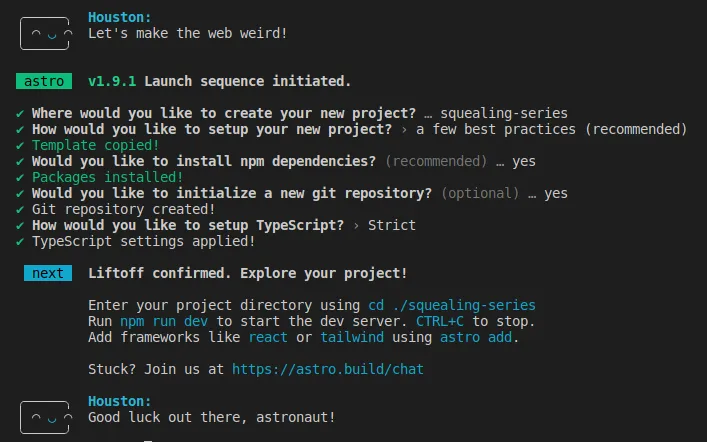
Once everything is all set up, cd into the newly created directly and check out your new static website by running npm run dev.
The Astro dev server will hot-reload any changes that you make so have some fun building out and styling your website to your own liking!
After you’re happy with what you’ve created, we can start thinking about making this ready for the outside world.
Go ahead and create a new repository on GitHub and follow the instructions to push up all of the work you’ve done so far.
Astro helpfully includes a “.gitignore” file for us when scaffolding out our project so we can safely git add . without fear of including any messy build artifacts.
Setting up AWS S3
Creating an S3 Bucket
At this point, we should have our new website sitting nicely in GitHub, ready for us to take the next step.
Now, login to your AWS console and search for S3 using the search box at the top of the page. Clicking through into Amazon S3 should give us a button saying “Create bucket”.

Clicking on this button will then present you with some options. Set the Bucket name to be the domain name that you’re planning on hosting your website on and choose an AWS Region that makes most sense for yourself (make a note of the name for later - for example “eu-west-2” in my case)
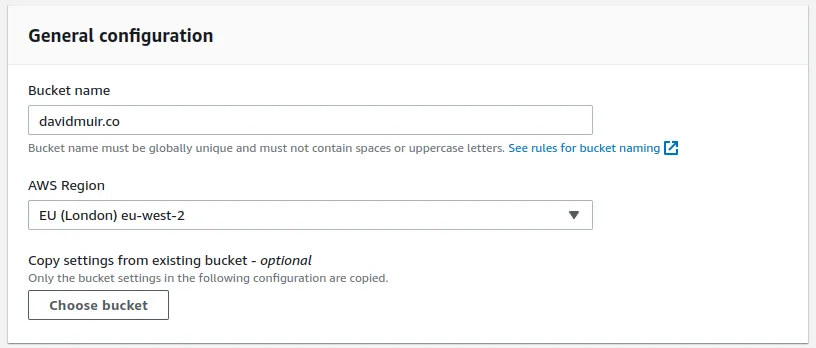
Make a point of naming the bucket the same as the domain name that you are going to be running this site on otherwise you’re going to end up with an error like the following later!

You will then need to allow public access to this bucket by un-ticking the following values. This is only safe in this case because we want our website to be publicly available. In most cases you wouldn’t want to expose the contents of your S3 buckets to the world so don’t take this as general advice!
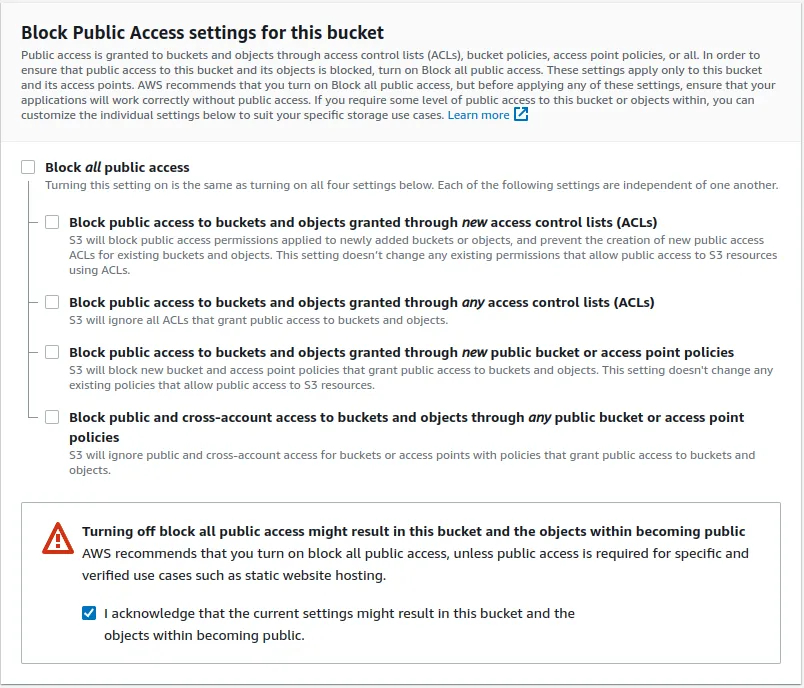
Everything else on this page can be left on their default values - so scroll to the bottom of the page and press “Create bucket” once more. At this point, you should see your new bucket available in the Buckets card - go ahead and click on the bucket name to open up the bucket.
Enabling Static Website Hosting
To set this bucket up to allow for static file hosting click on the “Properties” tab, and then scroll down to the very bottom. First, take a note of the “Bucket website endpoint” that’s shown here (we’ll need this later!) and then click on “Edit” next to “Static website hosting”.
You will then see the following page, set up as in the screenshot below and then click “Save changes”.
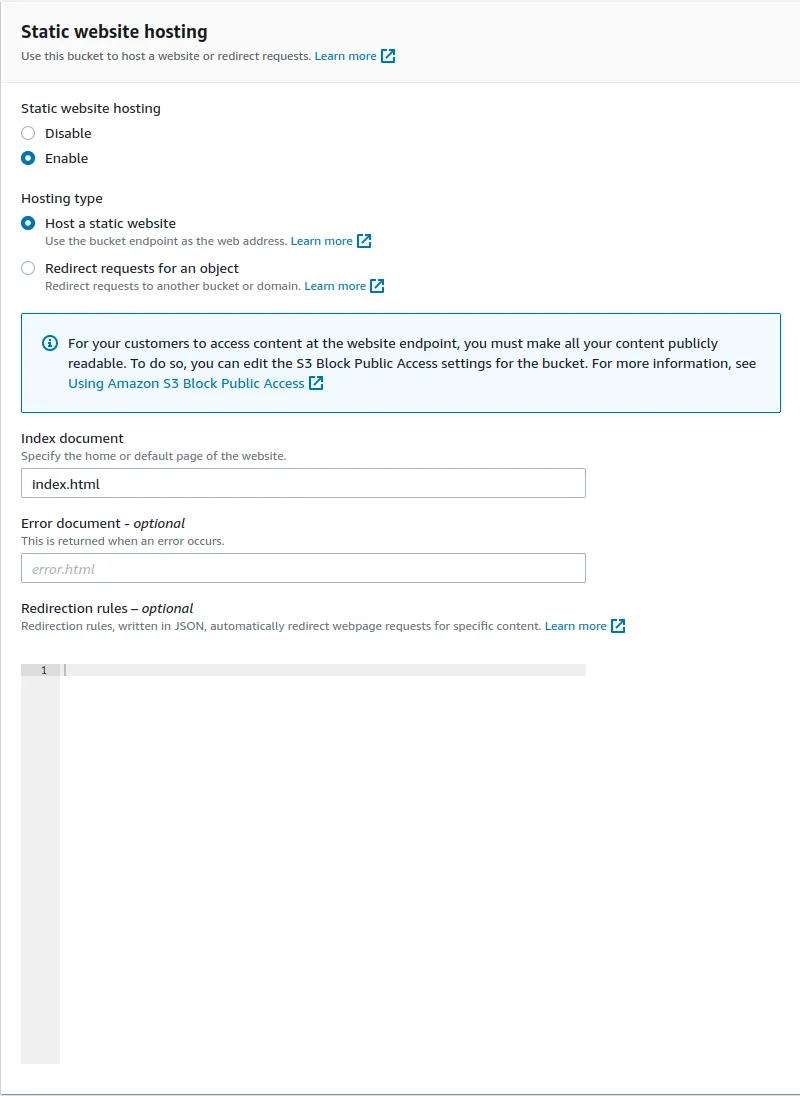
The final step here is for us to ensure that we only accept requests that are coming from Cloudflare’s ip range. To do this, go to the “Permissions” tab, and set the “Bucket policy” to be the following (replacing YOUR_BUCKET_NAME_HERE with your actual bucket name). The IP ranges included here were correct as of time of writing, but I’d suggest checking https://www.cloudflare.com/en-gb/ips/ for any changes.
{
	"Version": "2012-10-17",
	"Statement": [
		{
			"Sid": "PublicReadGetObject",
			"Effect": "Allow",
			"Principal": "*",
			"Action": "s3:GetObject",
			"Resource": "arn:aws:s3:::YOUR_BUCKET_NAME_HERE/*",
			"Condition": {
				"IpAddress": {
					"aws:SourceIp": [
						"2400:cb00::/32",
						"2606:4700::/32",
						"2803:f800::/32",
						"2405:b500::/32",
						"2405:8100::/32",
						"2a06:98c0::/29",
						"2c0f:f248::/32",
						"173.245.48.0/20",
						"103.21.244.0/22",
						"103.22.200.0/22",
						"103.31.4.0/22",
						"141.101.64.0/18",
						"108.162.192.0/18",
						"190.93.240.0/20",
						"188.114.96.0/20",
						"197.234.240.0/22",
						"198.41.128.0/17",
						"162.158.0.0/15",
						"104.16.0.0/13",
						"104.24.0.0/14",
						"172.64.0.0/13",
						"131.0.72.0/22"
					]
				}
			}
		}
	]
}
Setting up GitHub Actions
Setting up a user in AWS for programmatic access
Now that we have our bucket ready to be used it’s time to start deploying our website to it. To allow uploading files to our S3 bucket from GitHub we’ll need to create a user in AWS that has been set up to allow programmatic access.
In the AWS console, search for “IAM” and click through to get to the “Identity and Access Management (IAM)” console. If you fancy a quick diversion this may be a good time to follow any recommendations showing on this page around setting up MFA! Otherwise, let’s click into Policies from the menu on the left and click on “Create policy”.
Change tabs to the JSON editor, and paste in the following (updating the bucket name as before).
{
	"Version": "2012-10-17",
	"Statement": [
		{
			"Resource": [
				"arn:aws:s3:::YOUR_BUCKET_NAME_HERE",
				"arn:aws:s3:::YOUR_BUCKET_NAME_HERE/*"
			],
			"Sid": "VisualEditor1",
			"Effect": "Allow",
			"Action": ["s3:*"]
		}
	]
}
Click Next and you will be able to optionally add any tags that you want to attach to this policy. Once you’re finished here, click Next into the final section.
Give the policy an understandable name (I’ve personal gone for “personal-site-s3-deploy”) and optionally add a description before clicking on “Create policy” one more time to save.
We now need to create a user to apply this policy to. Click into the Users section of IAM and click on “Add users” to get to the following page.
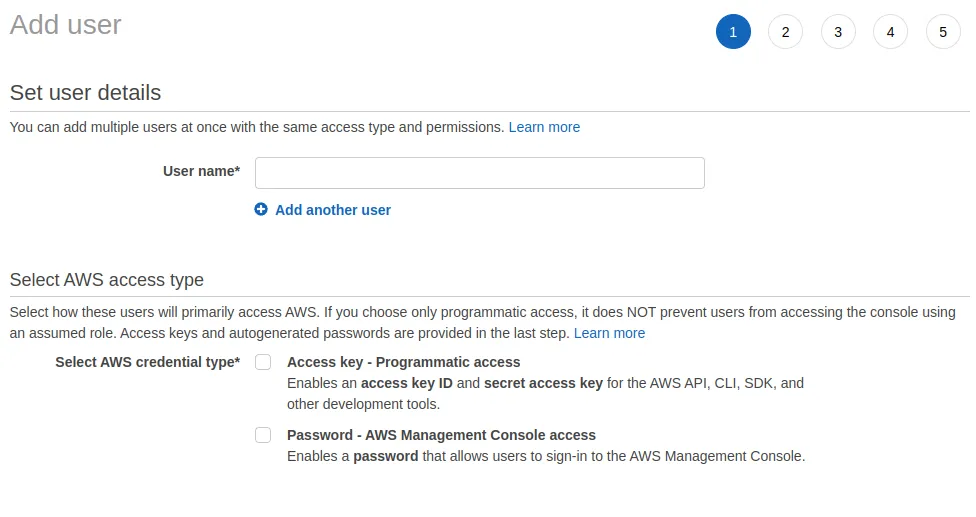
Set the User name to be something that identifies its purpose (I’ve gone for “github_deploy_personal-site) and tick the “Access key - Programmatic access” checkbox under “Select AWS access type” before clicking on the Next button.
On this step we want to attach the policy that we created before. So click on the “Attach existing policies directly” option, use the search box to search for the name of your policy, and then use the checkbox on that row to attach it.
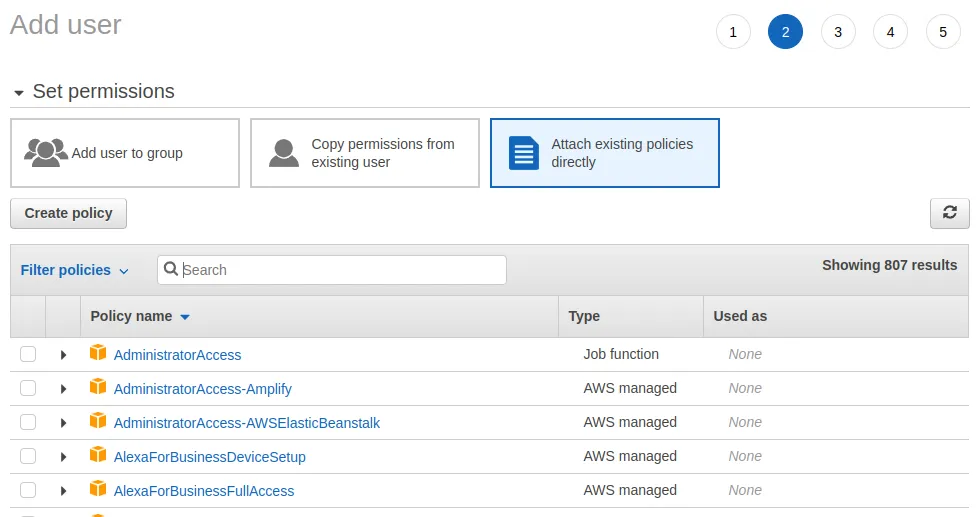
Clicking Next once more gets us to a step where we can optionally add some tags for the user, and then after clicking Next again we can review our settings before confirming.
On this final step make sure to copy both the Access key ID and the Secret access key (this will be the last time that AWS will show this secret key to you!) and we are now finished with the AWS part.
Creating an Actions workflow
We’ll then need to add those keys that we’ve just created into GitHub so that they’re available for the workflow we’re going to create. In the settings page for the repository you created on GitHub click on the “Secrets and variables” link in the sidebar and follow that up with another click on “Actions” directly underneath that. With that page open you’ll then be able to set up two separate secrets for each of the keys that we created in the previous section.
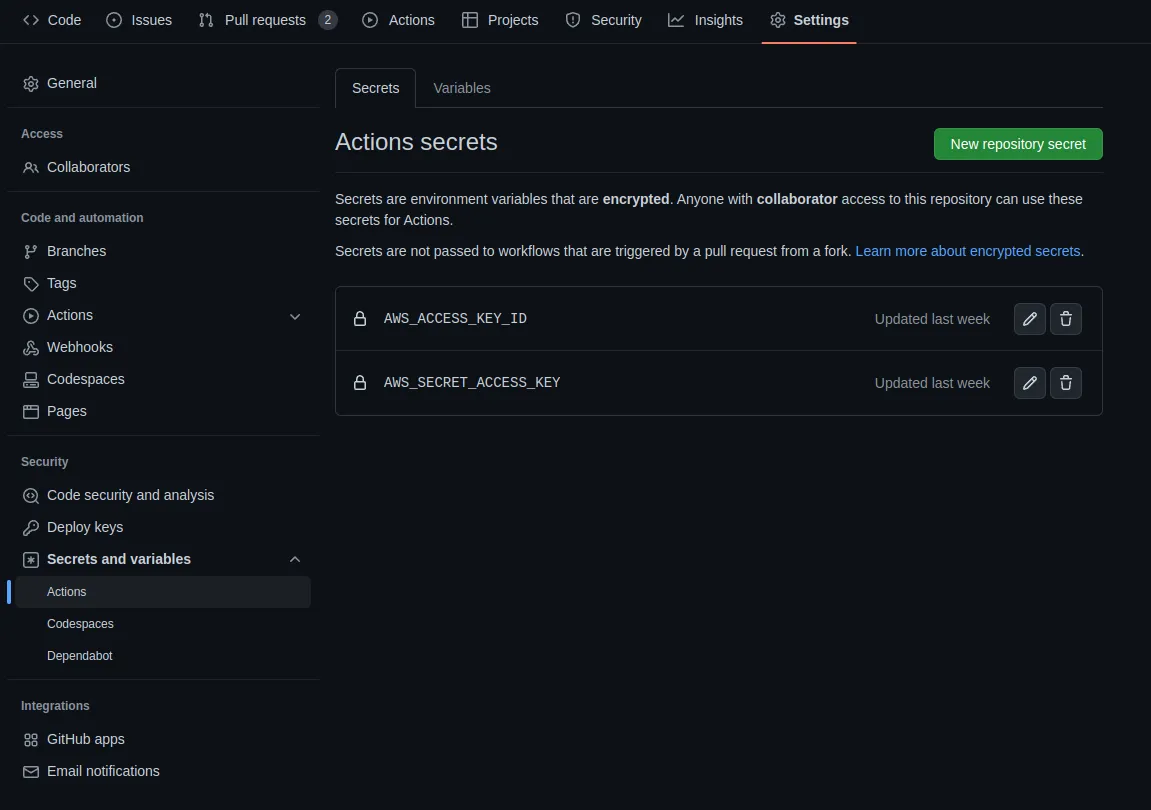
It’s now time to set up our deploy pipeline in GitHub actions. In your code editor of choice with the repository for your website open, create a .github folder and then directly under that a workflows folder. In this new folder create a yaml file for your new workflow (I’ve called mine deploy_to_s3.yml). You should end up with a structure like the following.
.
└── .github
    └── workflows
        └── deploy_to_s3.yml
In your workflow yaml filecopy and paste the following as a starting point:
name: deploy_to_s3

on:
  push:
    branches:
      - main

jobs:
  deploy_to_s3:
    runs-on: ubuntu-latest
    steps:
      - name: Checkout
        uses: actions/checkout@v3
      - name: Set up Node
        uses: actions/setup-node@v3
      - name: Restore
        run: npm ci
      - name: Build
        run: npm run build
      - name: Configure AWS Credentials
        uses: aws-actions/configure-aws-credentials@v1
        with:
          aws-access-key-id: ${{ secrets.AWS_ACCESS_KEY_ID }}
          aws-secret-access-key: ${{ secrets.AWS_SECRET_ACCESS_KEY }}
          aws-region: eu-west-2 # Replace this with the AWS region you've chosen
      - name: Deploy static site to S3 bucket
        run: aws s3 sync ./dist/ s3://YOUR_BUCKET_NAME_HERE --delete
What this workflow will do is, on each commit into your main branch:
- Checkout the latest copy of your code
- Setup Node for the build
- Restore your dependencies
- Build the solution
- Set up your AWS credentials (using the values we put into Secrets earlier)
- Deploying the code that has been built and placed in the
distfolder to our S3 bucket
Once you’ve got this all saved, go ahead and push this up to GitHub and check out the result on the “Actions” section of the repository on GitHub.
Setting up Cloudflare
I’m going to start this section with the assumption that you a) have a Cloudflare account and b) that you already have set up your website in Cloudflare. If you haven’t got that done yet, use your search engine of choice to find some documention on that and come back once you’re done!
If you haven’t already, change your domain nameservers to use Cloudflare’s (allowing up to 24 hours to allow the changes to propogate).
Now that you’re all set up on Cloudflare, the final step before your website is available and showing the content in S3 is to add a new “CNAME” record to the DNS configuration with your domain name as the “Name” and the content as the “Bucket website endpoint” that we noted down earlier in Enabling Static Website Hosting.
Finished Product
At this point we will have a static website hosted in S3, fronted by Cloudflare, and costing us pennies to run (assuming that you’re not massively popular)!